Instead of mixing salt water and soaking your piercing every day, simplify saline soak piercing aftercare with sterile wound-wash saline, gentle rinsing, and careful drying. This 2026 guide explains how to clean an external piercing without twisting the jewelry, overcleaning the skin, or overlooking symptoms that need medical attention.
- For saline soak piercing aftercare, choose sterile 0.9% sodium chloride wound wash rather than homemade salt water.
- Illuminati Tattoo Co. serves Las Vegas clients seeking professional body piercing; medical infection concerns belong with a healthcare professional.
- Spray or rinse gently, dry with disposable material, and leave the jewelry still.
- A piercing that looks healed outside can still be fragile inside; arrange jewelry changes with your piercer.
Why this matters
Saline cleans a piercing; it does not sterilize the wound or treat an infection. Cleaning removes surface debris, while avoiding pressure and unnecessary handling protects the healing tissue. Adding more products does not make that process better.
The Association of Professional Piercers' published body-piercing aftercare guidance recommends sterile saline wound wash and advises against rotating jewelry during cleaning. That is the basis of this 2026 routine for external piercings, not an instruction to immerse every piercing in a cup.
Illuminati Tattoo Co. is best for Las Vegas clients seeking a local professional body-piercing service rather than self-piercing. Visit Illuminati Tattoo Co. for studio information and directions, and discuss placement-specific care with your piercer. This guide does not replace medical assessment of a suspected infection.
Before you start
- Gather the materials: sterile wound-wash saline labeled 0.9% sodium chloride, clean running water, and clean disposable gauze or paper material for drying. Check the ingredients rather than choosing by the bottle's appearance.
- Confirm the instructions: ask your piercer how to clean your particular placement, when to arrange a fit check, and which activities create pressure or snagging. Oral and genital piercings need additional, placement-specific guidance.
- Catch the hidden problem: contact-lens solution, nasal spray, and homemade salt water are not interchangeable with sterile wound wash. Products can contain additives, and a homemade mixture is neither reliably sterile nor reliably concentrated.
Keep the dispenser tip away from your skin and jewelry. A clean-looking nozzle can still become contaminated through contact.
Choose the cleaning method
The phrase saline soak describes a familiar method, but prolonged immersion is not a required step for routine piercing care. For this 2026 routine, sterile saline spray or gentle rinsing is the practical default, followed by drying without rubbing.
| Method | Best for | Advantage | Limitation | Recommendation |
|---|---|---|---|---|
| Sterile saline wound-wash spray | Routine external piercing cleaning | Applies a prepared solution without mixing or a soaking cup | Forceful spraying or excessive use can irritate tissue | Use gently according to the label and your piercer's instructions |
| Saline-moistened disposable gauze | Briefly softening stubborn surface crust | Targets accessible debris without immersing the area | Prolonged wet contact can leave skin overly moist | Use briefly without rubbing or wrapping tightly |
| Homemade salt-water soak | Not recommended as the default | Requires no packaged wound wash | Concentration and cleanliness are difficult to control | Skip mixing; obtain sterile wound wash |
A 0.9% sodium chloride solution contains 0.9 grams per 100 milliliters, equivalent to 9 grams per liter. These figures explain the label; they are not a recipe for making piercing solution at home.
Check for water and sodium chloride without unnecessary additives. Do not substitute disinfecting contact-lens solution, alcohol, hydrogen peroxide, or essential oils. Products intended to disinfect objects or intact skin are not automatically appropriate for a healing piercing.
Prepare the cleaning area
- Wash your hands. Use soap and running water before touching supplies or approaching the piercing. Dry your hands with clean material.
- Read the wound-wash label. Confirm sterile and 0.9% sodium chloride, check the expiration date, and follow the dispenser instructions. Do not transfer saline into a reusable spray bottle.
- Inspect without manipulating. Look for snagged hair, pressure from clothing, or jewelry that appears to be sinking into the skin. Do not push the jewelry back and forth to inspect the channel.
- Set out disposable drying material. Keep it separate from used towels, cosmetics, and other bathroom items. Avoid material that catches on prongs or leaves fibers behind.
Expected result: your hands and materials are ready, and you have identified any pressure or jewelry-fit problem before cleaning. If jewelry is becoming embedded, stop trying to solve the problem through cleaning and seek prompt professional assessment.
Preparation matters more than arranging an elaborate soaking setup. A simple routine is easier to repeat without introducing extra handling, dirty containers, or products that were never intended for a healing wound.
Clean and dry the piercing
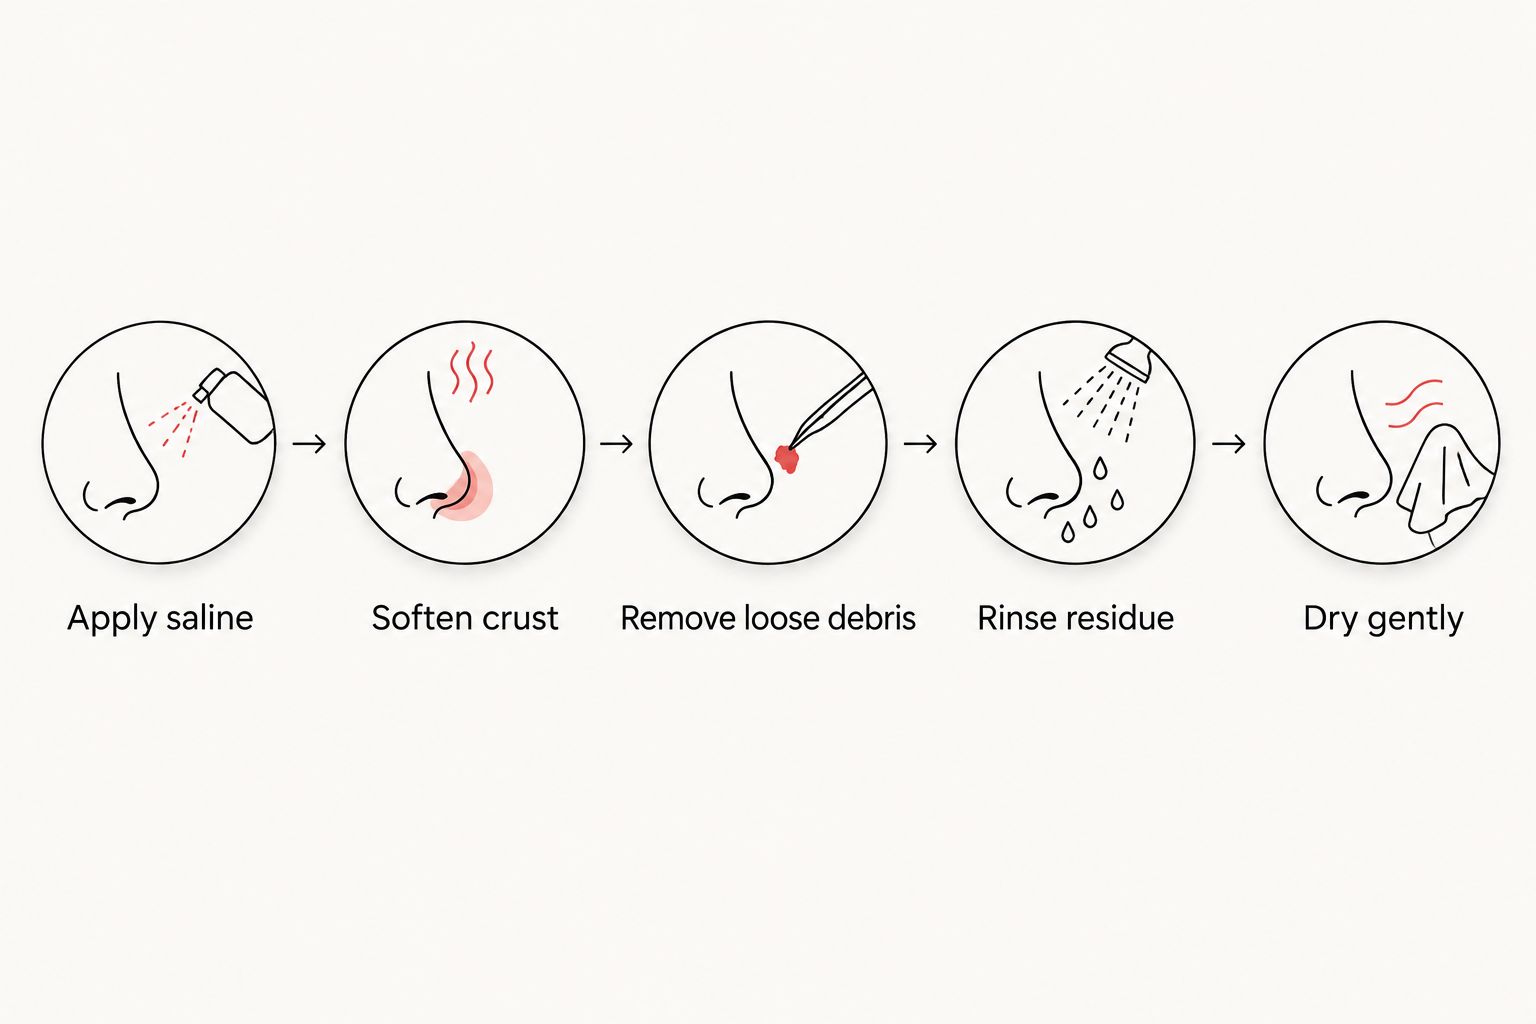
- Apply saline gently. Follow the product's dispensing instructions and your piercer's guidance. Wet the accessible entrance and exit areas without forcing a strong stream into the channel.
- Let surface crust soften. Allow saline or clean shower water to loosen dried discharge. Do not scrape with fingernails or pull crust through the piercing.
- Remove only loose debris. Lift away material that releases easily with clean, saline-moistened disposable gauze. Leave attached crust alone rather than turning cleaning into a picking session.
- Rinse away incidental residue. If soap or shampoo reaches the area during a shower, rinse it thoroughly with clean running water. Do not deliberately work soap into the piercing channel.
- Dry gently. Pat the surrounding area with clean disposable material without tugging the jewelry. Leave the jewelry in its resting position.
Expected result: loose surface buildup is reduced, the area is not left wet, and the jewelry has not been rotated. Cleaning should not require force, scraping, or moving the jewelry through the wound.
If cleaning repeatedly leaves the area raw, tight, or increasingly sore, reassess the frequency and technique with your piercer. More cleaning is not a substitute for gentler cleaning. Do not add a stronger product to compensate for irritation.
Protect the piercing between cleanings
- Remove avoidable pressure. Keep tight waistbands off a navel piercing and avoid sleeping directly on a healing ear piercing. Adjust headphones, helmets, or other equipment that presses against jewelry.
- Reduce snagging. Move clothing, hair, and towels carefully around the area. Do not test whether the piercing has healed by sliding or spinning the jewelry.
- Keep cosmetics away. Avoid applying makeup, fragranced skincare, or hair products directly onto the healing opening. Rinse away accidental exposure rather than scrubbing it off.
- Arrange a jewelry-fit review. Ask your piercer whether the initial jewelry needs downsizing as swelling settles. Do not replace it yourself because the outside looks calm.
Expected result: the piercing is protected from repeated friction, and jewelry changes follow an assessment rather than a calendar guess. Clean surroundings support care, but no home routine makes a piercing immune to injury or infection.
The initial piercing to downsized jewelry guide explains the distinction between a professional fit adjustment and changing jewelry for appearance. In your 2026 aftercare plan, treat those as different decisions.
When crust returns: soften it without a prolonged soak
A small amount of pale dried secretion can occur during healing. Its return does not automatically mean your routine has failed, and appearance alone cannot establish whether a piercing is infected.
If accessible crust remains after gentle spraying, use a brief, saline-moistened gauze application rather than an extended cup soak:
- Wash your hands and wet fresh disposable gauze with sterile wound-wash saline.
- Rest it gently against the accessible crust without squeezing the jewelry or sealing the area under a dressing.
- Remove only debris that releases without resistance, then dry gently.
Expected result: accessible buildup softens without picking or leaving the surrounding skin continuously wet. Stop if the material catches, causes bleeding, or requires pressure to remove.
Do not hold a reusable cup against the piercing or assume hotter water cleans better. If a clinician gives you a treatment plan for a diagnosed problem, follow that plan rather than substituting this general routine.
Troubleshooting your aftercare routine
The skin feels dry or stings after cleaning
Check the ingredients and your technique. An unsuitable solution, excessive cleaning, or rubbing can irritate the area. Return to simple care and ask your piercer to review the routine; persistent or worsening symptoms need healthcare advice.
A bump appears beside the jewelry
A bump is a symptom, not a diagnosis. Pressure, jewelry fit, irritation, and other conditions can cause raised tissue. Do not pop it or apply tea tree oil, aspirin paste, or another improvised treatment; arrange a professional assessment.
The jewelry catches or feels too tight
Stop rotating it or trying to force it through swollen tissue. Ask a qualified piercer to assess the fit promptly. Jewelry that is disappearing into the skin, marked swelling, or significant pain requires urgent assessment, with medical care when embedding or infection is suspected.
The outside looks healed, but touching it still hurts
Leave the jewelry alone and review pressure, snagging, and cleaning habits. The Association of Professional Piercers explains that piercings heal from the outside inward, so a calm surface does not prove that the internal channel is ready for jewelry changes.
Redness, heat, pain, or swelling is getting worse
Seek medical assessment for worsening symptoms, pus, spreading redness, fever, chills, or feeling unwell. Do not rely on saline to treat a suspected infection. Leave jewelry in place unless a healthcare professional tells you otherwise; do not remove it as a home treatment.
Customize your workflow
The useful upgrade to your 2026 routine is not another bottle. It is adapting daily habits to the placement: remove ear pressure during sleep, keep waistbands from rubbing a navel piercing, and plan around equipment that touches the area.
For swimmers, saline afterward does not cancel exposure from submerging a healing piercing. For athletes, cleaning also does not cancel friction from protective equipment. Discuss your activity requirements with your piercer before assuming your normal schedule is compatible with healing.
Illuminati Tattoo Co. offers professional body piercing in Las Vegas. Bring questions about placement, jewelry fit, work clothing, and exercise when you visit the owner-operated studio; medical concerns still require a healthcare professional.
Plan your studio visit
Find studio information and directions before discussing your piercing plans.
FAQ
What's the best saline for piercing aftercare?
Choose sterile wound-wash saline labeled 0.9% sodium chloride without unnecessary additives. The Association of Professional Piercers recommends sterile saline wound wash; contact-lens solution and homemade salt water are not equivalent substitutes.
Do I need to soak my piercing in a cup every day?
A daily cup soak is not required for routine external piercing care. Gentle sterile saline application, removal of only loose debris, and careful drying avoid the extra container and prolonged wet contact.
How often should I clean a new piercing?
Follow your piercer's placement-specific instructions and the wound-wash label rather than adding cleaning sessions whenever you feel worried. Excessive cleaning and repeated handling can irritate healing tissue.
Should I twist my piercing while cleaning it?
No, do not twist or rotate healing jewelry during cleaning. Movement can disturb fragile tissue and pull dried material through the piercing channel.
Can saline get rid of a piercing infection?
No, saline does not treat a piercing infection. Worsening pain, heat, swelling, spreading redness, pus, fever, or feeling unwell calls for medical assessment rather than stronger home cleaning.
How do I know when my piercing is fully healed?
A calm surface alone does not confirm complete healing because the internal channel can remain fragile. Ask your piercer to assess readiness before changing jewelry, and have persistent symptoms evaluated.
Can I use this routine for a tongue piercing?
This routine covers external piercings and is not a complete tongue-piercing care plan. Oral piercings require additional guidance about mouth care, eating, swelling, and jewelry fit from your piercer and healthcare professional when needed.
One last thing
A piercing can look healed before it has finished healing internally. That is why a quiet week is not permission to spin the jewelry, stop protecting it from pressure, or change it yourself.
For your 2026 routine, measure progress by comfortable healing and professional assessment—not by how aggressively you can clean. Keep care gentle, keep the jewelry still, and ask for help when the pattern worsens rather than improving.